Rope halters are inexpensive training tools favoured by horsemen and women all over the world. Their thin structure has less surface coverage, meaning corrections are sharper than that of a regular nylon/leather halter. Because of this, it is a favoured tool for green horses who need a clear signal, and stubborn horses who are maybe a bit pushy or hard to handle otherwise and need loud and clear corrections. Because of this, Rope Halters should be used with caution.
Today, I'll be creating a halter for my horse, Irish Diamond, who will be customized to resemble my last horse, Big Irish Red.
Because of the "Irish" theme going on here, I've decided to use a nice vivid green that will pop on both Grey and Chestnut.
Some things you'll need, are:
Six-strand embroidery floss or any similar thickness "thread." Beading cord works well. I would generally avoid plastic cord or elastic. Plastic is too rigid and won't tie well, and elastic is too stretchy, meaning you may not get an accurate fit. 1 millimeter (mm) or thinner elastic may work. Experiment with different threads and cords to figure out what works best for you! I will be using embroidery floss for this tutorial.
A pair of sharp scissors. Sharp scissors are recommended, because you will get a clean cut in your "rope" making it easier to work with when threading through the knots and loops.
A ruler or tape measurer for measuring "rope" length. I will be using a tailor's tape measurer today.
Water or other means to wet the thread. The edges will fray the more the thread is handled, so wetting the ends will make it easier to thread through the knots and loops.
Super Glue, fire, or tape. When the halter is made, you will want to secure the crown ropes together, so they're easier to thread through the tie loop.Superglue works just fine in most cases, but if nylon thread is used, fire might fuse the threads together. Alternatively, tape (ducttape) can be used. Super glue works fine for me, so this is what I will be using.
A body or body double of the model you will be making the halter for. I recommend using a body.
A chopped up toothpick to hold the knots open. (Optional) and at least one full toothpick to work the knots and loops. (not pictured)
Halter fit is a topic I will cover at a later date, but for now let's take a briefing.
The biggest problem in this hobby is halter fit. Oftentimes, I'll see nosebands too low and cheek pieces too long.
This is incorrect.
The correct fit of a halter means that the throatlatch should sit snugly (NOT TIGHTLY) behind the jaw. The cheek piece should be the length of the horse's cheek, and parallel with the cheek bone, and the noseband should rest right in front of the cheek. The halter rings should be just below the cheekbones evenly on both sides, and the lead loop/bottom of the noseband should not hang visibly low off the jaw. On a real horse, you should be able to fit two fingers under the noseband and the throatlatch at any given time,
The same is true for rope halters, save that the throatlatch tends to rest in the middle or last 3/4 of the jaw. (This is also true for some nylon web halters)
So, now that we have the proper fit fresh in our mind, let's get to work!
To find the minimum amount of rope or thread for your scale of model, take 650 and divide it by your scale (650/9 for traditionals; 650/12 for classics, etc) This will give you the length in centimeters.
You will need a minimum of 72 centimeters of thread or cord for a traditional. I will go 80 just so I have room for mistakes.
Measure and cut your thread, and then fold it in half to determine where the noseband will start.
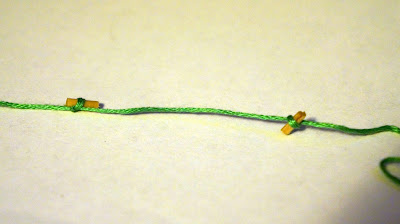
Place the center of the fold in the center of the model's face, putting it in the correct spot for the noseband. Then, with your free hand, gently pull one strand to one side of the face, pinch the spot under the cheek bone and tie a loose knot there. I use pieces of toothpicks to hold the knots open, as I am clumsy and have accidentally locked knots in the past. (if you are using a stiffer thread or cord, you won't have to use anything to hold the knots open)
Now, place the knot back in place on the horse's face, and do the same for the other side. Make sure they are even. Loosen and adjust the knots as needed until they fit.
Now you should have something like this:
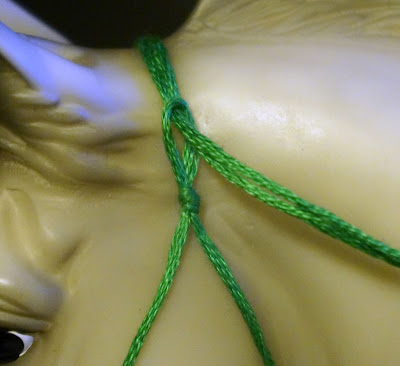
Next is to make the lead loop. Put the "rope" back on the horse's face and - making sure the knots are in their correct places - pull both threads together at the bottom of the jaw and pinch the area the knot will be at. If you know how to do a fiador knot, you can do that here. However, I don't, and I don't need anything so fancy. So, I will be doing a simple knot.
Instead of pulling the thread all the way through the knot, make a loop. Make sure the cheek knots are even and work the loop knot up into place. Check the fit before finalizing this knot, as doing it wrong will ruin the halter's fit. Remember, you want the knot to rest just below the jaw, not hanging off the face.
This is too loose.
Tip: Shoving a toothpick in the loop and tightening it will prevent the loop from getting too small.You can also gently wiggle and push down on the toothpick to loosen the loop as needed.
Using the toothpick to manipulate the loop and knot.
That's better!
At this point, you will want to separate the strands. They will usually tell you which way they want to go, so use the one closest to the left side of the horse first. Take it up the horse's jaw, and - keeping parallel to the cheekbone (imagine a line running from the cheek knot to this point) pinch where you want to tie the next knot.
Left strand (bottom), Right strand (top)
This will be another loop knot, and possibly the trickiest of the two. You don't want it to be set too high, and you don't want it to be set too low. To check this, make sure the knot below the jaw (where the string you're holding came out of) is centered in the middle of the jaw. Hold it there and use your free hand to measure and mark the next knot. You are marking the knot's location, not the loop. You want this knot to be able to run as close to a parallel line as it can between it and the cheek knot, and the cheek bone!
Tie the loop knot the same way the lead loop knot was made. This loop has to be large enough to thread the crown strands through in the end without being too large. The toothpick is a good aid for achieving this, again.
After that's done, take the string remaining from the loop and thread it through your cheek knot. Take your time to adjust it. You want the cheek piece to support the noseband and keep the throatlatch from deviating. So, you want it to be the length of the cheek bone, roughly.
Tighten the knot on the rope when you're sure it's in the right place.
Now, take that same strand and go OVER the nose, and thread it through the second cheek knot. MAke sure you adjust the knots so everything fits even after they're tightened.
Next, take the same strand we've been working with and meet up with the throatlatch strand we abandoned a while ago. Your goal here is to match the lengths up with the other side, so feel free to take off the halter and compare your "coordinates" with the finished side. Once you've got it matched up, tie another knot. Put the halter back on and pull the two strings over the horse's poll to check the fit.
If it fits, go ahead and thread the crownpiece through the loop and trim them to fit. I trimmed mine slightly long, because I knew I was going to mess up the next step.
Now the strings will stay together and make it easier to thread through the loop!
While you've got the superglue out, go ahead and put a small drop on the loops, and use the toothpick to distribute it throught the entire inside. This will reinforce them and keep them open so you can thread and clip easily. (Work one at a time.)
The finished halter!
The smaller you go, the thinner the material you use. On this stablemate portrait I did, I used some sort of golden thread.
I hope you found this helpful, and if you have any ideas or topics for future tutorials, let me know!
Over and Out!


No comments:
Post a Comment